Simply put, a desktop screencast is a recording of your computer screen – or part of it. It is commonly used for a number of different purposes, including creating video guides and tutorials, bug reports, software demonstrations, and so on. It can also be used to save any video content such as online streaming videos, TV shows, or live streams.
Of course, in order to record a desktop screencast, you will need a screen recorder like the Movavi Screen Capture Studio. Movavi Screen Capture Studio is a desktop recording software that is both easy to use and has a comprehensive set of features – allowing you to not only record videos but also edit them.
If you wish to record a desktop screencast, you just need to launch Movavi Screen Capture Studio and click ‘Record screen‘ in the menu. After that, you can define the area of your screen you want to record by drawing a frame around it using the mouse cursor – which is as simple as clicking and dragging it.
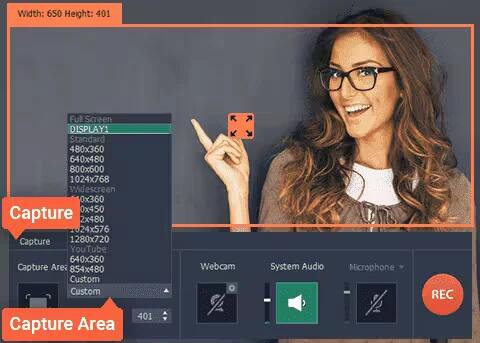
In addition, you can select the audio sources that you want to record by making sure the appropriate icons are highlighted. If you want Movavi Screen Capture Studio to record sound from the speakers then check that the ‘System Audio‘ icon is highlighted, or the ‘Microphone‘ icon for input from a microphone.
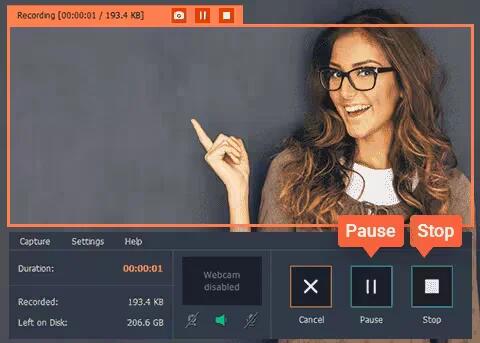
Before you start recording you could also adjust the sound levels, frame rate, or set Movavi Screen Capture Studio to capture any keyboard and mouse actions. When you are satisfied with the settings, click ‘REC‘ to start recording. You can pause recording at any time by clicking the ‘‘Pause‘ button and stop recording by clicking ‘Stop‘ when you are done. You can also use hotkeys: in Windows, hit F9 to pause and F10 to stop the capturing process. Keep in mind that there is also a timer and scheduler that you can use to automate the recording if you would rather not control it manually.
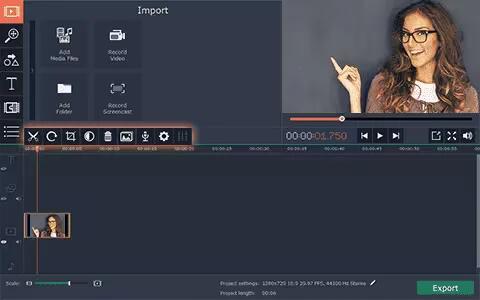
When you do click ‘Stop‘ a preview window will appear that you can use to go over the footage that was recorded. After the desktop audio/video recorder stops recording, you will see a preview window where you can either save the resulting video in a different format or open it in the built-in Video Editor for further tweaking. If you want you can trim out any unnecessary footage in that window itself, or you could open the video in Movavi Screen Capture Studio’s editor to edit it more thoroughly. You can also choose Open in Editor to enhance your raw footage and start making your software video tutorial or demo presentation look truly professional.
The Movavi Screen Capture Studio’s editor offers many features that will help you to improve your video. Not only will you be able to cut and join video segments, enhance the video quality, and fix common issues – but you could also apply special effects, add audio tracks, insert captions, and much more.
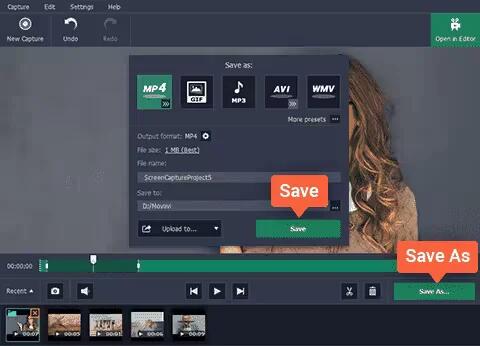
In addition, you can save your footage in any of many supported media formats, including AVI, FLV, 3GP, MKV, and MP4, or convert it for playback on your mobile device. To open the export dialog, select Save As in the screen recorder preview window or click the Export button in the Video Editor. Here, you can select the target format or mobile device. Screen Capture Studio supports Apple iPod, iPhone, and iPad, PSP, Nokia cellphones, Android-based smartphones, and many other devices.
It really is easy to record a desktop screencast using Movavi Screen Capture Studio. If you have not already tried it then you should make it a point to do so. The fact that it is so intuitive extends to its other features as well, so you should have no difficulty applying the editing tools that are available either and can use them to create some truly impressive and high-quality videos if you choose to.
See Also
- Movavi Mac Cleaner Review: A Simple Way to Clean a Mac
- 6 Best Live Streaming Apps For Android
- Video Compression Techniques
