Learn how to use WiFi on your HTC One M8. To use Wi-Fi, you need access to a wireless access point or hotspot.
The availability and strength of a Wi-Fi signal varies depending on objects the Wi-Fi signal has to pass through (such as buildings or a wall between rooms).
Turning Wi-Fi on
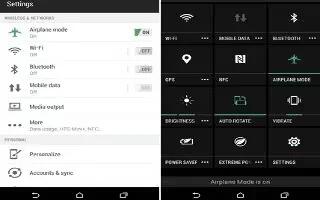
- With two fingers, swipe down from the status bar to open Quick Settings.
- Tap the Wi-Fi tile to turn Wi-Fi on.
- Tap . . . to see a list of detected wireless networks.
Note
- To manually scan for Wi-Fi networks, tap Menu icon > Scan.
- If the wireless network that you want is not listed, tap Menu icon > Add network to manually add it.
Connecting to a Wi-Fi network
- Turn Wi-Fi on, and check the list of detected Wi-Fi networks.
- Tap a Wi-Fi network you want to connect to.
- If you selected a secured network, enter the network key or password.
- Tap Connect. You’ll see the Wi–Fi icon in the status bar when connected.
Preventing notifications from unsecured Wi-Fi networks
You can prevent getting notified about unsecured Wi-Fi networks.
- Turn Wi-Fi on, and check the list of detected Wi-Fi networks.
- Press and hold an unsecured Wi-Fi network you want to stop being notified about, and tap Block network notification.
- To unblock an unsecured Wi-Fi network, press and hold the network name and tap Unblock network notification.
Connecting to a Wi-Fi network via WPS
If you’re using a Wi-Fi router with Wi-Fi Protected Setup (WPS), you can connect HTC One easily.
- Turn Wi-Fi on, and check the list of detected Wi-Fi networks.
- Tap Menu icon > WPS Push, and then press the WPS button on your Wi-Fi router.
Note
To use the Wi-Fi Protected Setup (WPS) PIN method, tap Menu icon > WPS Pin Entry.
Logging into a public Wi-Fi network automatically (WISPr)
You can set HTC One to automatically log into a public Wi-Fi network that you regularly use. This saves you the trouble of going through the Wi-Fi provider’s web authentication every time you connect to their Wi-Fi network. Just add your login credentials to the WISPr (Wireless Internet Service Provider roaming) settings.
Note
The access point of the Wi-Fi network needs to support the WISPr web portal. Consult the Wi-Fi provider for details.
- With two fingers, swipe down from the status bar to open Quick Settings.
- If Wi-Fi connection is off, tap the Wi-Fi tile to turn it on.
- Tap . . .
- Tap Menu icon > Advanced.
- Under WISPr settings, select Auto login and then tap WISPr account settings > Add a new account.
- Enter the service provider name, your login name (the full domain name), and password.
- Tap Menu icon > Save
- Connect to the public Wi-Fi network.
Note
- If you have access to several public Wi-Fi networks, you can add up to five sets of login credentials to the WISPr accounts list.
- In the WISPr accounts list, press and hold an account to remove or edit it.
