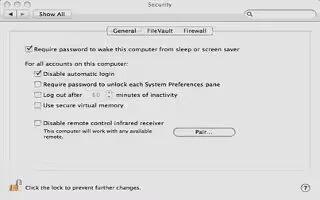
You can lock your Mac computer when you log out or step away from your desk can protect and prevent your files and folders from being accessed by others. For that, you have to modify a series of security settings in your Macs Security and Privacy menu under System Preferences. After you have modified and saved the necessary security settings, your Mac can be locked at any time by placing your cursor in a specific corner of your Mac’s desktop. After your Mac computer has been locked, it can only be unlocked by entering the correct username and password for your specific user account. Follow the simple steps below
Disable Automatic Login
Click on your Apple menu and choose “System Preferences.”
Choose “Security and Privacy” from the options provided.
Click directly on the “General” tab.
Click on the image of the “lock” icon.
Enter the administrator username and password at the prompt.
Place a checkmark next to “Disable automatic login.”
Click the “Show All” button in the upper-left corner of “Security and Privacy.”
Click on “Users and Groups.”
Click on “Login Options” at the bottom of the sidebar window.
Select “Off” next to the field labeled “Automatic login.”
Add Password Protection
Click on the left arrow in the upper-right corner of “Users and Groups.” This will take you back to the “Security and Privacy” menu.
- If you are not currently in the “Users and Groups” menu, select “System Preferences” from the Apple menu, navigate to “Security and Privacy,” then select the “General” tab.
Place a checkmark next to “Require password.”
Choose “immediately” from the drop-down menu next to “Require password.”
- You may choose any other time interval indicated within this particular drop-down menu; however, selecting another option may not provide your computer with optimal security.
Click on “Show All” in the top-left corner of the “Security and Privacy” window.
Select the option labelled “Desktop and Screen Saver.”
Click directly on the tab labelled “Screen Saver.”
Place your cursor on the slider button below “Start screen saver.”
Move the slider button to the time in minutes at which you want the screen saver to start automatically. This setting will only go into effect if you walk away from your computer and fail to lock it manually.
Click the “Hot Corners” button in the bottom-left corner.
Navigate to the corner in which you want your screen saver to launch when accessed by your cursor.
Select “Start Screen Saver” from any 1 of the 4 drop-down boxes.
Click the “OK” button.
Exit from the “System Preferences” menu. Going forward, your computer will lock, and your screen saver will initiate upon pointing to the “hot corner” you designated.
Note
If the type of work you perform on your Mac frequently triggers the screen saver by accident due to moving the cursor to the “hot corner,” return to the Security and Privacy menu and change the location of your hot corner.
